บางที่หลังจากอัปเดตเกม (หรือโดยสาเหตุอื่นๆ ) โปรแกรมจำลองจะแสดงข้อความว่า "ไม่สามารถเชื่อมต่อกับเครือข่ายได้" วันนี้ แอดจะมาแนะนำ 2 วิธีแก้ปัญหานี้
วิธีแรก: เปลี่ยนการตั้งค่า DNS ในโปรแกรมจำลอง
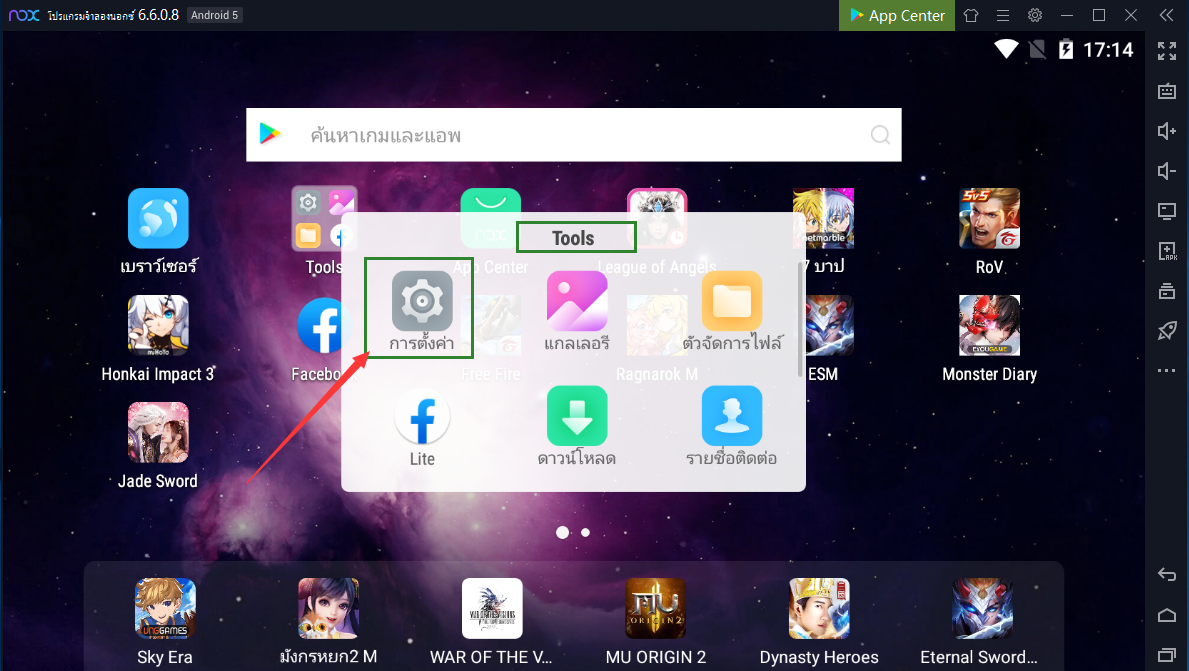
1.คลิก【Tools】→【การตั้งค่า】
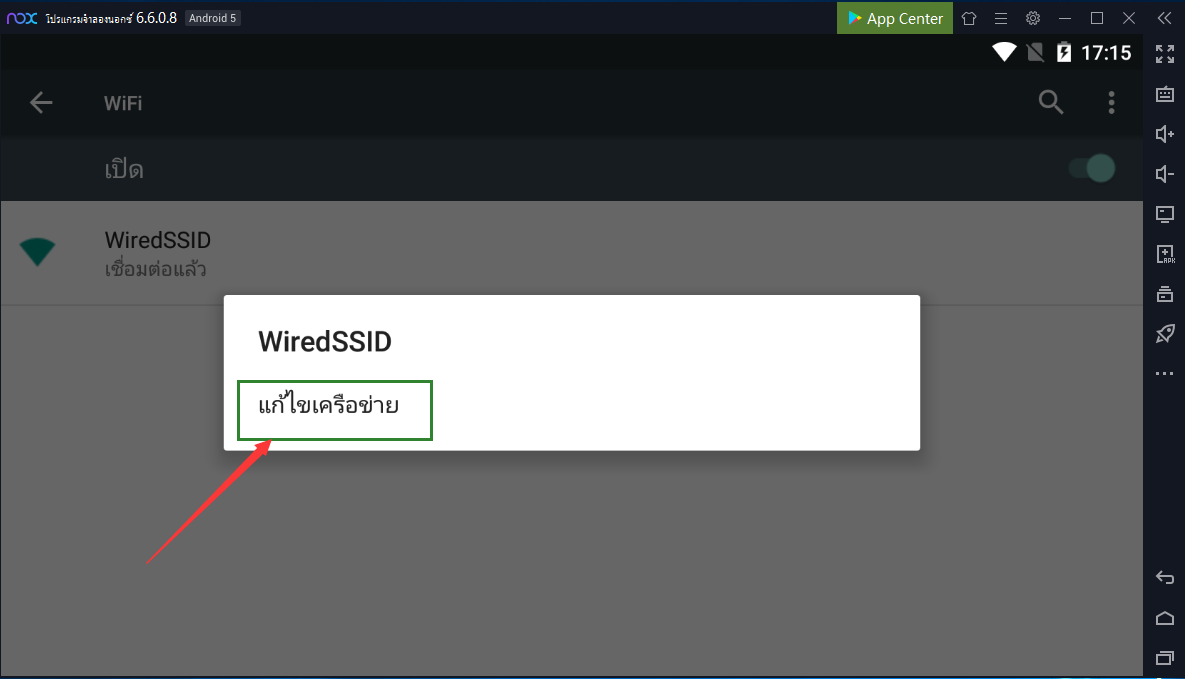
2.คลิก【Wifi】→ กดนาน【WireSSID】โดยใช้ปุ่มซ้ายของเมาส์ → คลิก【แก้ไขเครือข่าย】
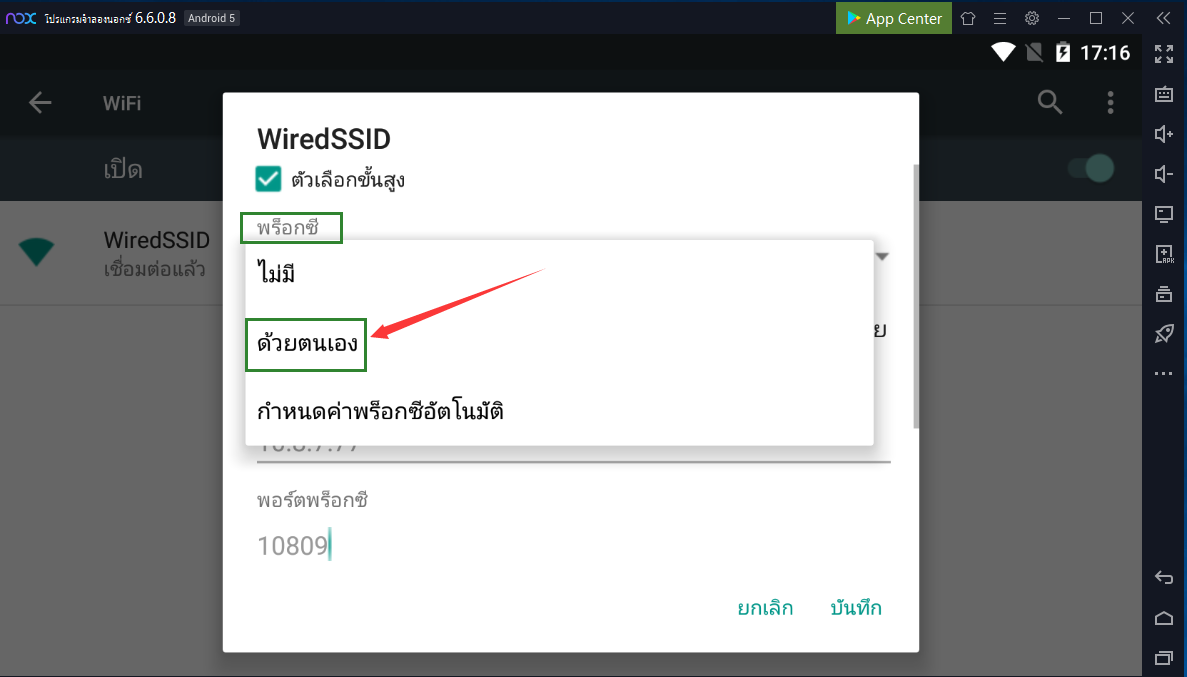
3.เลือก【ด้วยตนเอง】
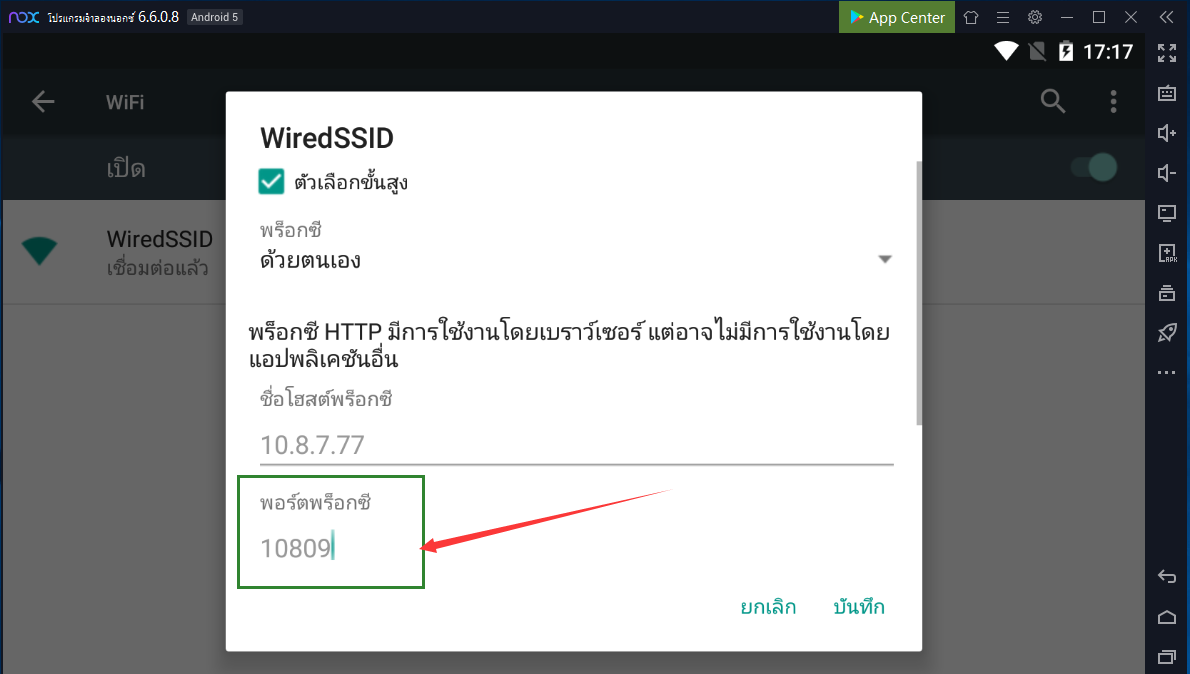
4.กรอก【ชื่อโฮสต์พร็อกซี】ตามที่อยู่ IP อินเทอร์เน็ตของคุณ และกรอก【พอร์ตพร็อกซี】เป็น 10809 โดยค่าเริ่มต้น
วิธีที่สอง: เปลี่ยนการตั้งค่า DNS (Windows 10) บนคอมพิวเตอร์
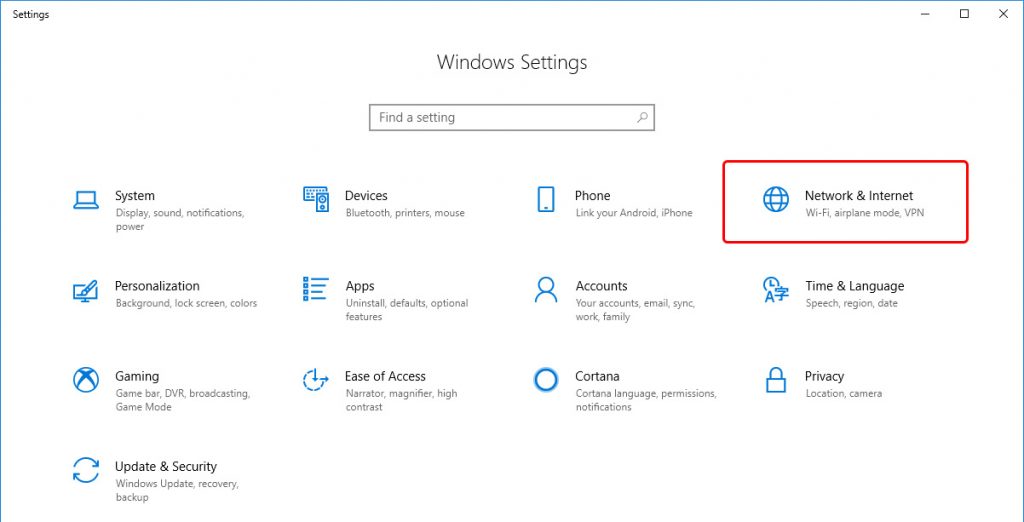
1.เปิด【the Control Panel】
2.คลิก【Network and Internet】
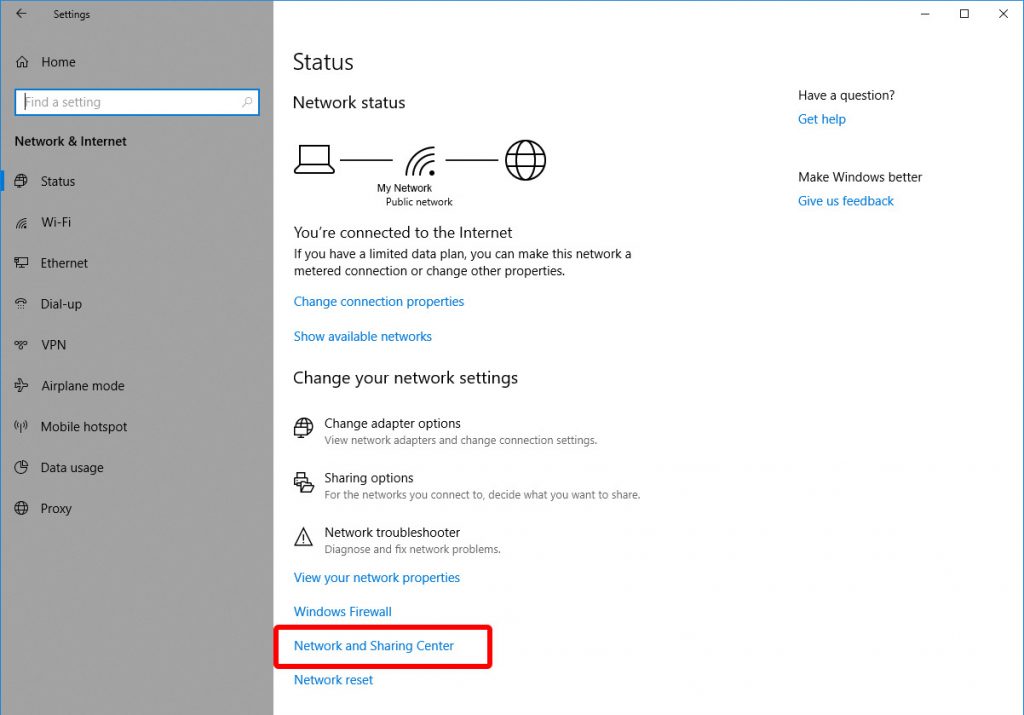
3.คลิก【Network and Sharing Center】
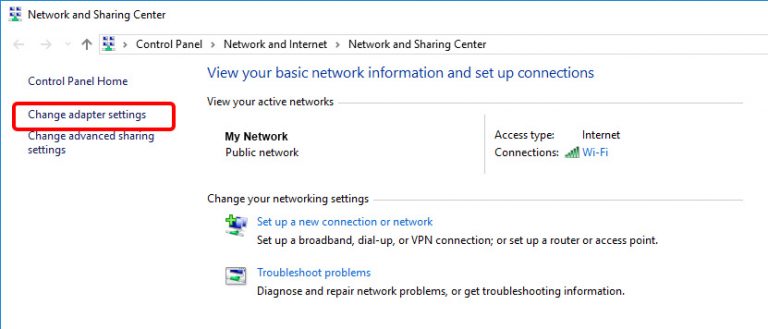
4.ในบานหน้าต่างด้านซ้าย คลิก【Change adapter settings】
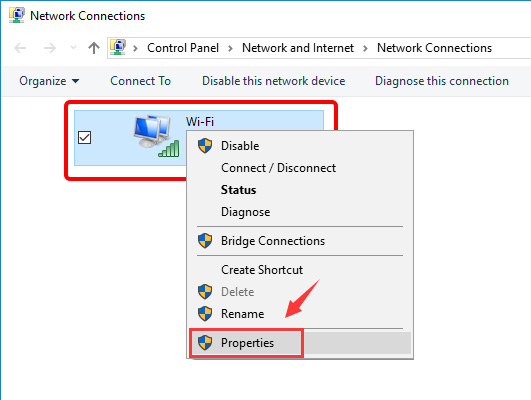
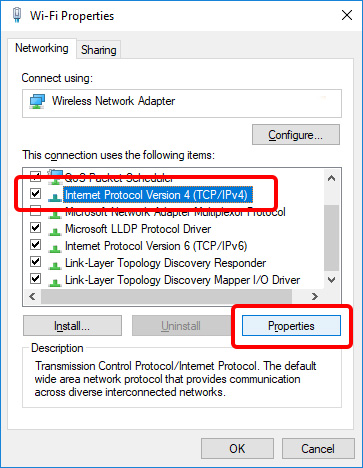
5.คลิกขวา【the network interface】เชื่อมต่อกับอินเทอร์เน็ต จากนั้นคลิก【Properties】เลือก【Internet Protocol Version 4 (TCP/IPv4)】
6.คลิก【Properties】
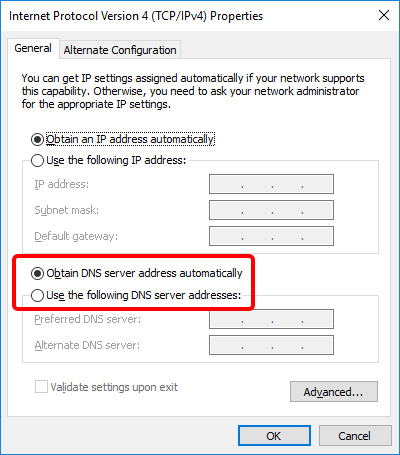
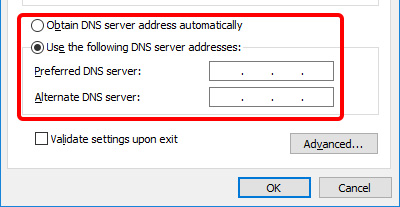
7.คลิก【Use the following DNS server addresses】→คลิก【Advanced】→เข้าสู่【IP address 】ในฟิลด์เซิร์ฟเวอร์ DNS
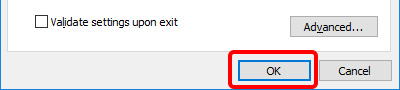
8.คลิก【OK】จากนั้นคลิก【Close】
สำหรับ Windows 7/8 >>คลิกที่นี่<<
ต่อไปคือที่อยู่ IP สาธารณะ DNS สาธารณะของ Google คุณสามารถเลือกที่จะกรอกได้
ที่อยู่ IP สาธารณะ DNS สาธารณะของ Google (IPv4) มีดังนี้
- 8.8.8.8
- 8.8.4.4
ที่อยู่ IPv6 สาธารณะของ Google DNS มีดังนี้
- 2001:4860:4860::8888
- 2001:4860:4860::8844
ขั้นตอนอย่างละเอียดดังนี้
1.เปิด【the Control Panel】
2.คลิก【Network and Internet】
3.คลิก【Network and Sharing Center】
4.ในบานหน้าต่างด้านซ้าย คลิก【Change adapter settings】
5.คุณจะเห็นไอคอนเครือข่ายที่นี่ คลิกขวา【the network interface】เชื่อมต่อกับอินเทอร์เน็ต จากนั้นคลิก【Properties】
6.เลือก【Internet Protocol Version 4 (TCP/IPv4)】
7.หาก“Obtain DNS server address automatically”ถูกเลือก คลิก【Use the following DNS server addresses】
8.คลิก【Advanced】→เข้าสู่【IP address 】ในฟิลด์เซิร์ฟเวอร์ DNS
9.คลิก【OK】จากนั้นคลิก【Close】
Note: หากโปรแกรมจำลองไม่มีอินเทอร์เน็ตโปรด>>คลิกที่นี่<<
ติดตามข่าวสารล่าสุด หรือหากคุณมีปัญหาใดๆ สามารถติดตามและส่งคำถามไปที่ แฟนเพจเฟสบุ๊ค NoxPlayer ประเทศไทย
ดาวน์โหลดและติดตั้ง NoxPlayer เวอร์ชั่นล่าสุดได้ที่นี่ >> คลิกที่นี่เพื่อดาวน์โหลด NoxPlayer เวอร์ชั่นล่าสุด <<